Showing posts with label cake. Show all posts

April 14, 2014

Spring Bunny Baskets - with files for Silhouette!

Looking for a quick and easy project this spring? You come to the right place! These baskets are inexpensive, easy, and would be great as gifts for teachers or co-workers. I made them for the sweet ladies my boyfriend works with and filled them with paper grass and cupcakes! Yepp, those are cupcakes! And they're not that hard to decorate! (read on for the link!)

If you have ever been in the dollar section at Target, then I'm sure you can relate. If you haven't, go to Target NOW! It is the best and worst idea Target ever had. The best because it is filled with tons of adorable items, and for the most part they are only $1!!! But this can also be a very bad thing, because you pick up a million things telling yourself, "Its only a $1, I cannot pass this up!" and then you get to the register and your total is $47... I may or may not be speaking from experience.

Anyway, I found these adorable baskets in the dollar section and had to get them because the colors were so spring-y! And then I used some extra vinyl I had sitting around.

So these baskets were not even $2 a piece to make!

I got the chevron bunny file from the Facebook group All Things Silhouette Cameo & SD but you can download it here!

Then I used the font Making Lettering Tall, that you can get for free here!

I always use Oracal vinyl, but any kind will work for these baskets since they won't be outdoors or washed.

First you want to open your Silhouette program and open the Chevron Bunny file. Then size the bunny to however big you want it to be on the basket. I made mine 2 1/2 inches tall. Then duplicate it to make however many bunnies you want. I did nine because I had three of each color basket.


Now you want to open a new project in Silhouette and choose the text tool. Then on the right hand side scroll in the font options to find Making Lettering Tall. Click where you want the text and type a name, or whatever you want on your baskets. Then I always fill in the color because it makes it easier for me to work with, and I also like to change the line thickness (under the line tab).


Next you want to size your vinyl to what you need and place it, color side up, on your mat. Then load your mat into the Silhouette and go to the cut settings. Select the vinyl option from the menu or input your own settings. I normally choose the vinyl setting and then increase the thickness to 10. Now you're ready to cut!

Once you've cut your bunnies and names, weed out (remove) the excess vinyl. Always clean the surface you're about to adhere vinyl to; I normally use rubbing alcohol or glass cleaner. Then using your contact paper or transfer tape, my favorite is the Cricut brand (I know this is a Silhouette tutorial... don't judge me!), pick the vinyl up off the backing and stick it to your basket. Repeat until all baskets are adorable and done!

On to the inside. First off, the cupcakes. I just made a basic white cake with vanilla buttercream frosting, but you could use any kind of cake and pretty much any kind of icing as long as it is not too runny to pipe and it crust when it dries (I wouldn't recommend canned icing). These adorable flowers are easier to make than they look, I found some awesome tips and pictures over at My Cake School.


Now your ready to fill up your baskets! For mine, I balled up some green tissue paper to fill up most of the space, then put the cupcake on top and filled in the holes with the paper grass. This seemed to work the best for me, just make sure your icing has had plenty of time to crust, so they don't get messed up as easily.


These take a little time, but they are pretty inexpensive and adorable gifts for spring. And who doesn't love bunnies?!


But that's not all! Check out these other blogs for 40 more awesome Spring Silhouette Projects!

Seriously, you have to go look at them! These other 40 bloggers and I are participating in the Silhouette Challenge where each month we all post a Silhouette project with that month's theme! Here are the themes so be sure to check back each month for more awesome projects!


Want to Check Out More Silhouette Projects?

My Silhouette Challenge buddies and I are all sharing projects on our blogs today, so peruse the projects below for a wealth of Silhouette inspiration! Spring Cleaning - Custom Canisters I Love Paris In the Springtime Etching for Sping - Mug Personalization for the April Silhouette Challenge WHEELY excited about spring No-Sew Fabric & Burlap Peter Cottontail Banner Narwhals, plus friends Gold Fern Easter Eggs Mr and Mrs Easter Egg Head Easter Bunny Plate Welcome Spring - A Sign From Tile Paper Flowers Wall Art DIY: Bunny-Stamped Goodie Bags for Easter Inspirational Window Now We Have Everything Nursery Art Spring' and Flowers Paper Banner Glitter Jars with a Happy, Hoppy Bunny Made with the Silhouette + Free Cut File! Mother's Day Wreath Decorate A Watering Can With Vinyl! April Showers Sketch Pen Printable Spring Wreath Burlap Garden Flag with Heat Transfer Vinyl Pretty Little Herb Pots Peter Cottontail Door Hanger Spring Has Sprung Spring Has Sprung - Subway Art Bloom And Grow Sunflower Bouquet for Teacher Appreciation Sharpie Easter Eggs Tear Open Easter Egg Cards Look what's Blooming! ~ Silhouette Challenge Everblooming Paper Bouquet Silhouette Challenge: Spring Polish Swap Card [B] is for Bloom: Scrap Lumber Flower Vases Tulip Time - Fridge Magnets Neon Paper Pinwheels {tutorial} A Happy Spring Card Sketching Just Got Easier! Spring Bunny Baskets Bird Nerd Easter Eggs Easter Peeps Treats with {FREE} Printables and Cut File Garden Bench Update
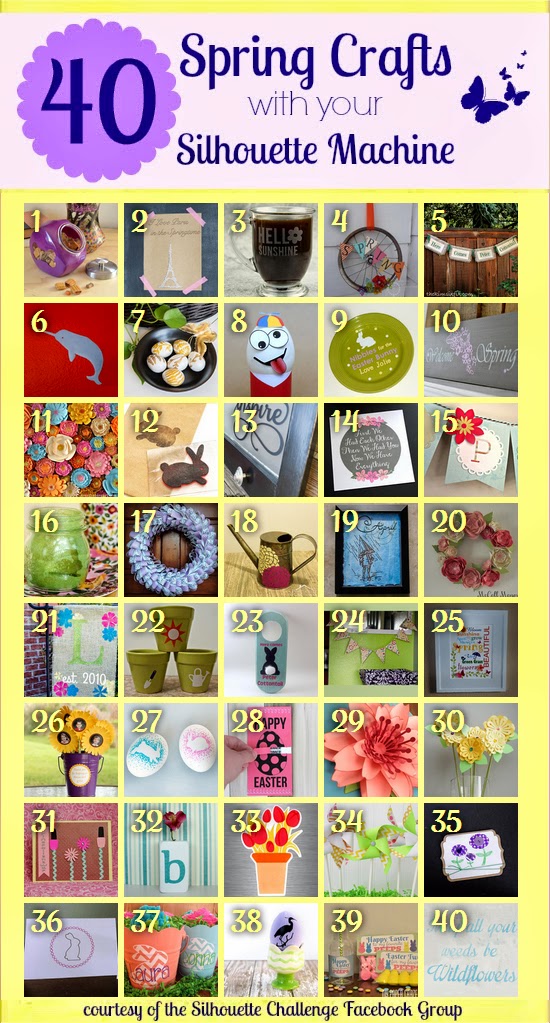
1. Dream a Little Bigger // 2. So Much Better With Age // 3. Adventures in All Things Food // 4. Creative Carnival // 5. The Kim Six Fix // 6. feto soap // 7. One Dog Woof // 8. The Experimental Home // 9. From Wine to Whine // 10. Architecture of a Mom // 11. Grey Luster Girl // 12. Minted Strawberry // 13. Designed Decor // 14. Tried & True // 15. Silhouette School // 16. Bringing Creativity 2 Life // 17. Weekend Craft // 18. Practically Functional // 19. Please Excuse My Craftermath... // 20. McCall Manor // 21. unOriginal Mom // 22. Creative Ramblings // 23. A Tossed Salad Life // 24. A Glimpse Into Barb's Life // 25. Kate's Paper Creations // 26. Simply Kelly Designs // 27. Cutesy Crafts // 28. Persia Lou // 29. Whats Next Ma // 30. Two Purple Couches // 31. The Frill of Life // 32. Nearly Handmade // 33. Get Silvered // 34. Ginger Snap Crafts // 35. Life After Laundry // 36. The Sensory Emporium // 37. Monograms & Cake // 38. The Thinking Closet // 39. My Paper Craze // 40. Chicken Scratch NY

December 14, 2013

Vera Bradley Inspired Cake

About a year ago I took the first 3 courses in the Wilton Cake Decorating Series, and I LOVED it! If you are thinking about taking the classes and can't decide, go for it. It was one of the best things I've done as far as my decorating skills are concerned and my instructor gave us so many tips and tricks from her experience.

However, since this past summer I haven't made any cakes because I've been busy with school. So yesterday I began this cake with great hesitation... But my decorating classes paid off once again and it was a success!


Now I'm gonna share some of my favorite tips and the things that help me make a great cake.

First of all, the cake recipe I use for most of the white cakes I make came from Recipe Girl. It starts with a box mix, but it tastes 1,000,000 times better!

Wonderful White Cake (or Cupcakes)

makes 2 - 9 inch rounds plus a little extra, or about 36 cupcakes

Ingredients:

  • 1 box white cake mix
  • 1 cup all-purpose flour
  • 1 cup granulated white sugar
  • 3/4 teaspoon salt
  • 1 1/3 cups water
  • 2 Tablespoons vegetable or canola oil
  • 1 teaspoon vanilla extract
  • 1 cup sour cream
  • 4 large egg whites

Directions:
  1. Preheat oven to 325°F. Cut parchment paper the size of your pan and put it in the bottom, then grease the sides; or place cupcake liners in cupcake pans (you'll need approx. 36).
  2. In a large bowl, whisk together cake mix, flour, sugar and salt. Add remaining ingredients and beat with a mixer for 2 minutes. (the full 2 minutes are needed! otherwise your cake will be flat)
  3. Pour about half of the batter into each pan, or until the pan is 3/4 full. (set aside extra batter to make a few cupcakes!) Or fill cupcake liners 3/4 full. Bake the cake for 24-26 minutes or the cupcakes for 18-20. Test with a toothpick to see if they are done. 
  4. Let cakes cool completely and then remove from pan.
Tips:
  • For the cake I made I wanted 3 layers, so I made two recipes and used the extra batter for cupcakes.
  • I always use Wilton Bake Even Strips (link at bottom of the post) when baking cakes to help them be more uniform in color and shape. The tops won't dome as much, so you don't cut as much off when you level the cake. And the sides don't get darker than the rest of the cake.


When icing the outside of a cake, I always use the recipe I learned in my decorating classes. It comes out pure white and it holds up really well, especially in humidity. The recipe is from Wilton.

Wilton White Buttercream Icing 

makes 2 1/2 cups icing 

Ingredients:
  • 1 cup solid vegetable shortening
  • 2 teaspoons clear vanilla extract
  • 6 -7 teaspoons water
  • 1 lb. powdered sugar
  • 1 tablespoon meringue powder
Directions:
  1. Cream shortening, flavoring, and water together. 
  2. Add dry ingredients and mix on low speed until fully combined.
Tips:
  • Crisco sticks are the best shortening to use because it is already measured for you and 1 cup = 1 stick.
  • Making a double recipe is the easiest way to make this icing, and then you will have enough to icing your whole cake plus some for decorations.
  • When you add your dry ingredients, place a towel around the top of the bowl before you mix. Then you won't have powdered sugar dust all over your kitchen.
  • This recipe makes a stiff consistency icing, but medium consistency is needed for icing cakes and adding decorations. Add 2-4 teaspoons of water to reach medium consistency; it should be like toothpaste but a little thicker. 
  • If you don't have meringue powder you can leave it out, but the icing may not hold up as well in humidity. 


When coloring my icing, I prefer to use Americolor instead of Wilton, but it's just a personal preference. I think it gives a more intense color and it's easier to dispense because of the squeeze tops. For this cake I made 3 recipes of icing and colored 2 recipes teal (I had a lot of extra), and used the 3rd recipe for my other colors. I made about 1/2 cup black, 1 cup green, and 1 cup white.

After you level your cake, refrigerate it. After you stack your cake, refrigerate it. After you put the main color of icing on, refrigerate it. 

The best trick I learned in my decorating class, which was from my instructor, was don't stress over making your icing super perfect. Put the icing on as best you can, covering all holes and making it generally smooth. Then use the paper towel trick. This YouTube tutorial shows you what to do.

Before pipping anything on my cake I used a toothpick to draw all of the lines out. This really helped me to visualize things and if you don't like it, you can smooth it back out and re-draw it. 

Then pipe everything on. I always start with the top, work my way down the sides and finish with the boarder. When you pipe in this order there is less of a chance of bumping or messing up what you've already done. That's all there is to it!


December 9, 2013

Momogramed Red Velvet Cake Pops


To start off my blog and the holiday season, I thought these cake pops would be a great first post!

To tell you a little bit about my self, I have always loved baking. I can remember when I was little baking with my mom and my grandma, and now about 12 years later I have improved quite a bit in both my baking and decorating skills! 

Another fun fact about myself, I am OBSESSED with monograms. Like Reese Witherspoon says, "My rule is, if it's not moving, monogram it!" 

I recently ordered a Silhouette Cameo and I love using it for all of my monogramming projects! One of my favorite projects will by posted shortly, so check back soon. 

So now you can probably understand where the name for this blog came from, two of my favorite things! But enough about me for now, it's time to share this super easy red velvet cake pop tutorial with you. 

I originally learned how to make cake pops from Bakerella's blog. She is the Queen of Cake Pops! I highly suggest going to look through her pictures for some inspiration. Or even buying her book (listed at the bottom of this post), which is amazing!

If this is your first time making cake pops or maybe the first time you've even heard of cake pops, you've come to the right place!

There are two variations of cake pops: bake-in-pan cake pops or cake-and-icing cake pops. I am blogging about the cake-and-icing kind, which are pretty self explanatory. You bake a normal 9x13 sheet cake, and mix it with icing!

The first step to making these cake pops, is getting together the ingredients. All you need is a box of cake mix (any flavor you want), a can of icing (something that goes with the cake flavor), and candy coating. I prefer to use almond bark for a white or chocolate coating, or Wilton Candy Melts for a colored coating. Melted chocolate chips or chocolate bars might work to, but in my experience candy coating works MUCH better!

Now you are ready to bake the cake. Just follow the instructions on the box and bake in a 9x13 pan. Once you take the cake out of the oven, let it cool completely. I normally put mine in the freezer for about 30 minutes.

Once the cake is cooled, its time to get messy! That beautiful cake you just baked, break it to pieces. Yepp... you read that right. Break the cake up in pieces and put it in a large bowl.

Add the entire can of icing to your cake pieces and stir, stir, stir! This step can take some arm strength if you're using a spoon, but you can also use your hands if you really want to get messy. I think using my hands is easier because everything comes together faster, but I hate the mess so I normally use a silicon spatula.

Keep stirring until there are no icing streaks and no cake pieces visible. It should look like a sticky, soft dough.

Now its time to make the cake balls! I use a rounded tablespoon to make mine all about the same size, and I roll them with my hands. Again, a big mess. And if you're using red velvet cake mix, you'll look like you've been caught red handed! Ha ha ha... okay, maybe not so funny.


Then you put them in the freezer for about  15 minutes. While they're in the freezer melt you candy coating and get you lollipop sticks ready. Take them out of the freezer, dip a stick in candy coating and then gently push it into the center of the cake pop. Put the cake pops with the stick back in the freezer for a few minutes. Take them out and dip them in the melted candy coating; I use a spoon to help cover the tops. Just remember to be gentle! Or this could be a really bad experience, as in all of the cake pops will fall off the sticks. And trust me, that is not fun.


And last but not least, decorate how ever you wish! Although, I suggest monograms. (: 


Red Velvet Cake Pops
Makes 36-40

Ingredients:

  • 1 box red velvet cake mix (or any flavor)
  • 1 can cream cheese icing (again, any flavor)
  • 32 oz. candy coating (almond bark, candy melts, etc.)
  • lollipop sticks
  • decorations

Directions 

  1. Bake the cake mix according to the directions on the box. 
  2. Let the cake cool completely; you can put it in the freezer for about 30 minutes and it will be cool
  3. Break the cake up into pieces in a large bowl. 
  4. Add the entire can of icing, and stir until completely mixed together. 
  5. Use your hands to shape about a tablespoon of cake dough into a ball. 
  6. Place cake balls on a parchment lined plate or baking sheet and put in the freezer for 10-15 minutes. 
  7. Melt the candy coating in a microwave safe bowl, in 15 second increments. 
  8. Take cake balls out of the freezer. 
  9. Dip the end of the lollipop stick into the candy coating and gently push into the center of the cake balls. 
  10. Place back in the freezer for 3-5 minutes. 
  11. Remove from the freezer again and dip the cake pops into the candy coating; I use a spoon to help cover the tops of the cake pops. 
  12. Place either upside down on parchment paper to dry, or right side up in a cake pop stand. I did mine both ways because I didn't have enough room on the stand for all of them. 
  13. Decorate as you wish and that's it! 

Tips:

  • Don't skip the freezing step after putting the sticks in. The cake pops will fall off the stick and you will be ready to pull your hair out!
  • Reheat your candy melts to keep them at a smooth consistency while you're dipping your cake pops. This will make it easier on you and they will look better!
  • If you want to use homemade cake and icing, add the icing in small increments. You can always add more icing but if you add to much they will be ruined!